If you run a Webflow site, you have probably done the manual version of this at least once. Someone fills out your contact form, the submission lands in Webflow, and later you copy their name and email into Mailchimp by hand. It works until it does not. People get missed, exports go stale, and a busy week means a backlog of leads sitting where your email tool cannot see them.
The usual fix is a general-purpose automation tool that charges you per task. That works too, but it is more moving parts than most Webflow owners want, and the pricing gets awkward as your volume grows. This guide shows the direct route: connect Webflow to Mailchimp with QuillJet, a native Webflow Marketplace app, so form submissions flow in on their own. No middleware, no scripts, and nothing to babysit.
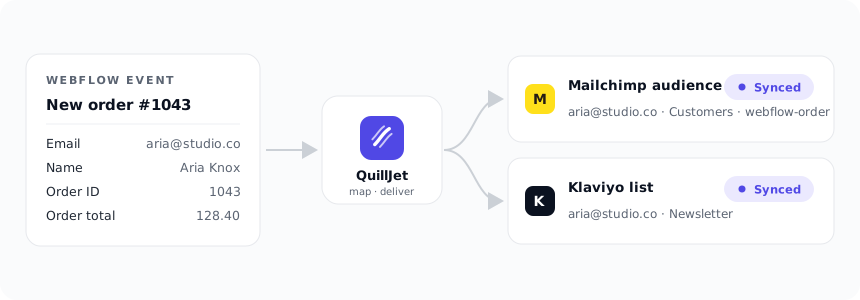
One thing to be clear about up front: QuillJet does not send email. It takes the contact from each Webflow event and adds or updates that person in your own Mailchimp audience. Mailchimp still owns the sending, the unsubscribe handling, and your automations. QuillJet just makes sure the right people show up in the right list.
What you need before you start
You need three things: a Webflow site with a form on it, a Mailchimp account, and a QuillJet subscription. QuillJet has a free plan plus flat paid plans with no per-task metering, so you always know what a month costs. It scales by how many sites, tools, and events you need.
Mailchimp is one of seven email tools QuillJet supports. If you use something else, the same steps apply to Klaviyo, Brevo, MailerLite, ActiveCampaign, Omnisend, or GetResponse. Mailchimp just happens to be the most common request, so it is the one we walk through here.
Step 1: Connect your Webflow site
Install QuillJet from the Webflow Marketplace and authorize it for the site you want to sync. QuillJet asks only for the read scopes it needs for the triggers you turn on, so it can see form submissions and orders but it is not given permission to change anything on your site.
When a new site connects, three triggers are enabled by default: new order, inventory changed, and form submission. For this guide, form submission is the one that matters, and it is on out of the box. You do not need to touch the CMS triggers unless you also want to sync CMS items later.
Step 2: Connect Mailchimp
In the Email tools tab, choose Mailchimp. Mailchimp uses one-click sign-in, so you approve the connection in a Mailchimp window and you are back in QuillJet a moment later. The six other tools connect with a scoped API key instead, and ActiveCampaign also asks for your account API URL, but Mailchimp keeps it to a single click.
Mailchimp requires you to pick a target audience. This matters: if a sync rule tries to deliver to Mailchimp without an audience selected, the delivery is recorded as failed with the error no_target_list. So pick the audience you want your Webflow leads to land in while you are here. It saves a confusing moment later.
Step 3: Build one sync rule
A sync rule is the heart of QuillJet. It ties one Webflow event to one email tool connection, with the field mappings, tags, and conditions you want. For this walkthrough you need exactly one rule.
Create a new rule and set it up like this:
- Trigger: Form submission
- Destination: your Mailchimp connection
- Target audience: the Mailchimp audience you picked in step 2
That is enough to make it work. The moment the rule is enabled, the next person who submits your form gets added to that audience as a subscriber.
Step 4: Check the field mapping
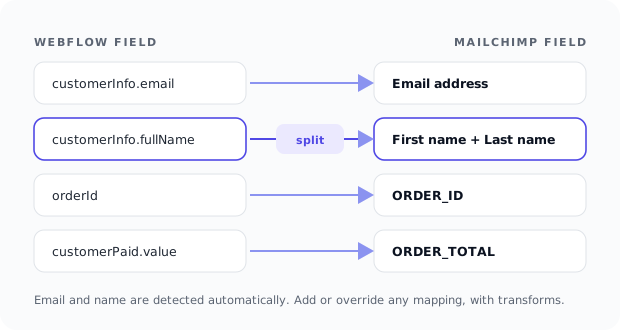
QuillJet builds the contact for you before you map anything. It pulls the email address from the submission automatically, scanning the form fields for an email-shaped value if the field is not obviously named. It also works out first and last name, either from explicit name fields (it recognizes labels in several languages, including voornaam, achternaam, prenom, and nom) or by splitting a single full-name field.
So a basic contact form with a name and email needs no mapping at all. Where mapping earns its keep is your extra fields. Say your form has a “Company” field and a “How did you hear about us” dropdown. Open the rule editor, add a mapping for each, and point it at the Mailchimp merge field you want it stored in.
You also get a few small transforms to tidy values on the way in: lowercase, uppercase, trim, capitalize, and split-first or split-last for pulling one part out of a combined field. If you want every contact from this form tagged, add a tag on the rule, for example “webflow-contact-form,” so you can segment them in Mailchimp later. Constants let you stamp a fixed value onto every contact, and they always take priority over anything mapped.
There is a live preview in the rule editor that shows you the contact QuillJet would build from a sample event, so you can see the finished subscriber before a single real submission comes through.
Step 5: Add a condition if you want to filter
Sometimes you do not want every submission in Mailchimp. Maybe your form has a checkbox for “Email me updates” and you only want to add people who checked it. Conditions handle this.
A rule can have several conditions, and all of them have to pass for the contact to sync. The operators are straightforward: exists, equals, not equals, contains, and the numeric comparisons greater than, greater than or equal, less than, and less than or equal. If you leave conditions empty, everything passes, which is the default.
Here is the useful part to understand: when a submission does not meet your conditions, QuillJet does not fail it and does not hide it. It records the delivery as skipped. You can still see it in the event log, so you always know it arrived and why it did not sync. Skipped is not an error, it is a decision your rule made on purpose.
Step 6: You are live
Once the rule is enabled, you are done. From that point on, every matching form submission is turned into a subscriber in your Mailchimp audience within moments of it being submitted.
Two things are worth knowing about timing. First, QuillJet works on new events only. It does not backfill the form submissions you collected before you set this up, so if you have old leads sitting in Webflow, export those once by hand. Everything from now on is automatic. Second, delivery is queued and retried. If Mailchimp is briefly unreachable, QuillJet retries with increasing gaps between attempts (30 seconds, then 60, then 120, then 240) up to five attempts before it gives up and flags the failure. You do not have to do anything for a normal hiccup to sort itself out.
Where to watch it work
Every submission, synced or skipped or failed, shows up in the Event log with a clear status. Open any entry and you can see the contact QuillJet built and what your email tool sent back. If something failed, there is a one-click retry right there, so you are never stuck exporting a CSV to recover a handful of leads.
That visibility is the quiet benefit of doing this natively instead of through a chain of automations. When a lead does not show up in Mailchimp, you have one place to look and a plain-English reason waiting for you, whether it is a missing email in the submission, an audience you forgot to pick, or a condition that filtered the person out on purpose.
One detail worth knowing about Mailchimp specifically: it identifies a subscriber by the MD5 hash of the lowercased email, which is exactly how QuillJet upserts. In practice that means Aria@Studio.co and aria@studio.co are the same person to Mailchimp, so if a visitor submits your form twice, the second submission updates their record instead of creating a duplicate. We lean on that hash on purpose: re-submissions, and Webflow’s own webhook retries, never split one person into two contacts.
The short version
Connect Webflow, connect Mailchimp and pick an audience, build one form-submission rule, map any extra fields, add a condition if you want to filter, and enable it. The whole thing takes a few minutes, costs a flat monthly price, and then runs without you. If you use Klaviyo, Brevo, MailerLite, ActiveCampaign, Omnisend, or GetResponse instead of Mailchimp, the same five steps apply. Want to see the full setup with screenshots? Head to the docs, or reach out through the support form if you get stuck.